
Did you ever found yourself and your teammates having trouble keeping up with all your different Postman collections? Struggling to retrieve a modification you did on an obscure query only used once every full moon? Having to put JSON files all over your Git repo because you have 40 APIs that you’re working on?
Add a bit of free time, a touch of JavaScript, and the right amount of Stack Overflow research, and voilà, you have the solution that I will explain to you right now!
Here are the steps you will need to follow to become a collections sync expert:
1. Prerequisites
2. How to synchronize your collections
3. Setting everything up
4. Using the scripts
5. Technical explanations
6. Sharing your collections
7. Conclusion
1. Prerequisites
This is what you’ll need in order to run the scripts smoothly (Smooth Operator starts playing):
- NodeJS
- Postman
- Windows OS
The scripts are not working on either Linux or macOS as far as I know, if an update comes out I’ll try to make it possible.
2. How to synchronize your collections?
If you want to use this solution to share your Postman collections with your teammates, you have two different solutions, the one provided natively in the software and the one I’m about to show you. The main difference being that I needed something a bit more custom-made as the client I was working for had strict security measures.
So, instead of exporting and importing your collections as JSON files manually, I decided to create some scripts to do it for me, remember what they say?
A good developer is a lazy developer.
3. Setting everything up
First of all, you will need to clone the repository from this location cap4lab / cap4lab-blog / Postman collections article / scripts.zip — Bitbucket.
In order to download the zip file, you’ll have to click on “view raw”.
Once this is done, you can go to the Postman API Platform and create an account if you don’t already have one.
If you do have an account, please log in and go to your account settings page (image 1) (postman.co)), you will find a menu called “API keys” on the left panel (image 2).
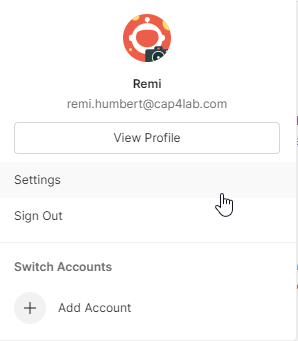
image 1
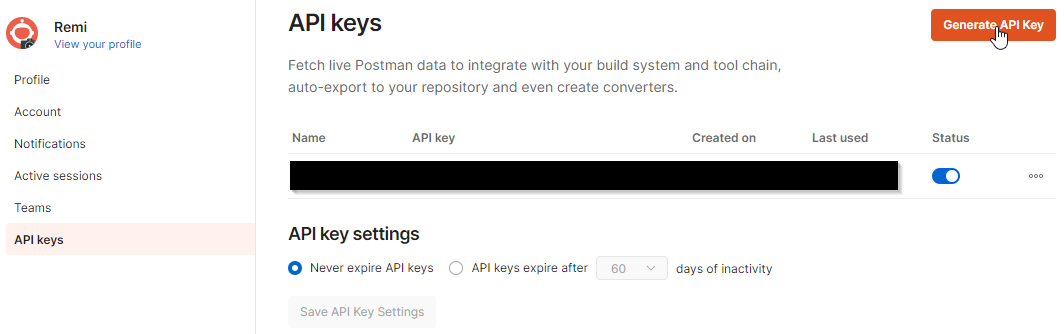 image 2
From this interface, we can create an API key linked to our account, this is required in order to have working scripts as they use the Postman API to manage your collections.
Now, you can create a new key, give it a name, and copy it to your clipboard (image 3), note that this will be the only time you’ll be able to copy it in its entirety!
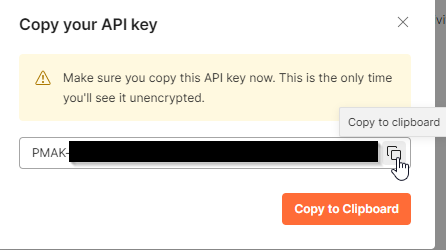
image 3
If by mistake you don’t have a clear copy of your API key anymore, you can always regenerate it in the same interface (image 4), but you’ll have to paste the new key everywhere the old one was used.

image 4
When your key is created, go to the scripts repository and open this file: scripts/config.json.
Paste your API key in the corresponding field and fill in the “collections” property with the full path leading to the folder to which you want to save your collections.
You can see a configuration example below (image 5):

image 5
Also, a good thing to point out, is that the scripts can use a proxy server if you or your organization are using one.
It was one of the main points to deal with for me as the client this was made for is using a local proxy server and I needed to go through it.
You can enable or disable the use of a proxy server by setting the “use_proxy” property (image 6) as true or false, but don’t forget to fill in the proxy’s information first! In the picture you can see my proxy configuration when using CNTLM, however, it needed the “tunnel” property to be set as true to work correctly. “tunnel” is telling the “node-rest-client” module to send the request to the address in the proxy config (tunnel: false) or to pass through it and send the request to the address specified in the API query (tunnel: true).
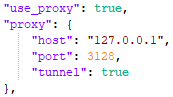
image 6
These are the only settings you’ll need to change in order to get the scripts working.
Now that all the setup is done, we can finally start using the scripts. There are 3 different files, that do 3 different things (who could’ve thought). Let me present them in order :
creation.js: this adds a new instance of every collection in your personal workspace. Useful when you start working with a new collection or if this is the first time you’re using this solution all.
backup.js: that one exports your collections as local JSON files. Typically used when wanting to share your changes with your team.
update.js: the very opposite of backup.js, uses the collections in local JSONs to update the collections in your Postman workspace. To use when you need to import someone’s changes.
To run the scripts, open a command line and use the following command node backup.js.
You’re good to go! All set to use this homemade solution. Time to show you how these scripts work, I promise it ain’t complicated or magical.
5. Technical explanations
To make the explanations more visual and easier, I made a quick diagram for each script. Bear in mind that they don’t respect any standards or anything like this, it’s just a little help.
backup.js
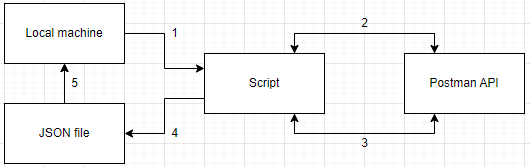
image 7
Running the script with node.js
GET request to retrieve all the collections data, since we need their IDs.
Another GET request for the collections JSON content.
Creating a single JSON file for each collection.
Saving the JSON files to the local machine.
update.js
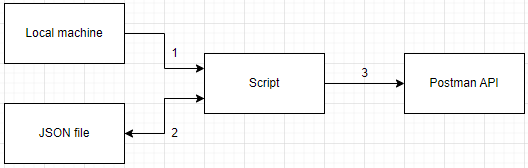
image 8
Running the script with node.js
Reading the JSON files containing the collections.
PUT request to update the collections in your Postman online workspace.
creation.js

image 9
Running the script with node.js
Reading the JSON files containing the collections
POST request to create the collections in your Postman online workspace.
6. Sharing your collections
This part is mostly up to you, use your preferred method of versioning, as it is best to be able to retrieve the old version of the collections in case something goes wrong, but pretty much anything will do! If you prefer sending emails or uploading files to a server, it’s your way to do it.
Personally, I did a quick interface in a .bat file that made the calls to the Git repository and ran the scripts for me. That way, by just pressing one button (actually, it’s more like two or three), all the changes I did were available to my teammates, and I didn’t need to bother with committing and pushing changes myself. The same goes for the collection's import, not having to pull the branch every time is a real comfort, more than a gain of time.
7. Conclusion
Well, now that I showed you around, what do you think?!
This project took a bit of time to finish as I had to refresh my JavaScript skills, but I’m very glad about the result. It does indeed help the team to keep an updated archive of all the Postman collections we have (almost 50), and they’re really excited about this project is done.
Hopefully, you can achieve the same results with your teammates. If so, glad I could help!
If you have any feedback you’d like to share or issues to report, please open an Issue on the GitHub page, and I will gladly have a look at it!